Showing posts with label Cookies. Show all posts

Thursday, December 20, 2012

Kolazcky Cookies - Guest Post!

Today's guest post is by my favorite baking buddy, Christina of All's Fare Food blog!  Christina and I are Cupcake Camp buddies every year, and love to bake together while our hubbies watch football.  Whenever the four of us go out to dinner, we all go home with sore cheeks because we have so much fun and laugh so hard.  Christina is a great friend and an excellent baker, so here we go!

---


Hello to all the readers of Boston Sweetie’s blog! I’m so happy to have been invited here to share a cookie recipe during this holiday season.

Growing up in the huge Midwest melting pot that is Milwaukee, I had the great privilege to be around all different types of ethnic foods. Each summer on the shores of Lake Michigan, you could flock to one of the weekly ethnic festivals like Irish Fest, Festa Italiana, German Fest or Polish Fest. At these weekend-long events, you could experience snacks and meals with an authentic touch from the old country.

One of my favorite recipes that could be found in many of Milwaukee’s southside bakeries is the Kolaczky Cookie. Pronounced coh-latch-key, this Polish cookie is flaky and filled with a fruity jam.  Several other European countries have their own version of the kolaczky with names like kolache, kolacky or kolace and can be filled with everything from sweet fruit to savory cheeses.

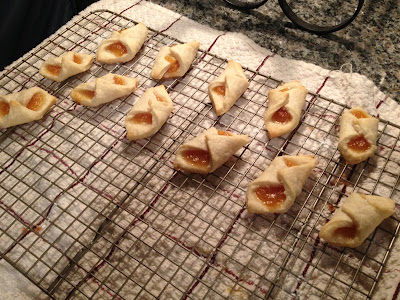
The kolaczky is actually quite easy to make. First, select your favorite filling – I opted for an orange marmalade that I found on the shelves at Home Goods one day. Then, mix together the dough, which is super simple to make. Finally, put the cookies together and bake. In about two hours, you can have more than two dozen of these wonderful cookie treats.


Orange Apricot Marmalade
I hope you enjoy!

What You’ll Need

  • 4 oz (1/2 brick) cream cheese, softened
  • 6 oz (1 1/2 sticks) butter, softened
  • 1 1/2 C all-purpose flour
  • 1 jar filling of choice (apricot, raspberry, strawberry preserves or jam etc.)
  • Confectioners’ sugar for dusting

Putting It Together

Beat the cream cheese and butter together until fluffy. Add in the flour a 1/4-cup at a time. Mix well. Cover the dough with plastic wrap. Chill in the fridge for at least 1 hour.


Preheat oven to 350 degrees.

On your work surface, use a mixture of granulated and powdered sugar to prepare the dough. Do not use flour here.

Roll out your dough to about 1/4-inch thick using a rolling pin. Add more of the sugar mixture if it gets too sticky.

Using a circle or square cookie cutter, cut into 2-inch shapes and place on cookie sheet.


Add about 1/4-teaspoon of filling to the center of the dough. Overlap opposite corners of the dough to cover the filling.


Bake for about 15 minutes until golden brown. Then, remove to a cooling rack.

When cooled, dust with powdered sugar and serve. Store in airtight container.


Sunday, December 16, 2012

Thin Mint Gooey Cake Bars

Hi Sweets, guess what?  I'm baaaack!  I hope you enjoyed the posts from Cheryl and my Jake the past few days!  "B-hubs" as he likes to call him has really been on a baking roll lately, I love it!


Tonight I am excited to share a brand new recipe with you - Thin Mint Gooey Cake Bars!  Yes, I took cookies that are pretty amazing and made an even BETTER cookie, by adding chocolate, Andes candies, and my favorite, cake!

This recipe (and the Thin Mints I used) were shared with me by the Girl Scouts of Eastern MA.  I was so excited to try out the bar cookies to bring to a family Christmas dinner tonight, and they were a hit! The title of "bars" makes you think of brownie-sized bars.  Word to the wise; quarter those squares!  This recipe turns out super delicious, but super SUPER rich.  Like, way too rich for even the biggest sweet lover to eat a whole square.  When cut up into bite-size mini squares, it's the perfect cookie-size portion.

The title tells it all- there's plenty of minty chocolate and lots of delicious (and surprisingly un-messy) 'gooey' atop a buttery yellow cake crust. So good!

The best part is that one of the ingredients you need to make these cookie bars is the Thin Mint cookies themselves.  Now that it's officially Girl Scout cookie time, it's perfect timing to try these out for a holiday gathering.  Cookies are available December 7th through March 12, so keep an eye out for your local Girl Scouts getting their sell on!


When I was a "brownie" and a "junior" Girl Scout, I was always a top seller and had so much fun selling cookies for my Girl Scout troop.  This has been an American tradition for nearly 100 years and all of the proceeds help girls learn important skills while raising funds for leadership activities.  The money helps Girl Scout troops take part in service projects, go on field trips, attend summer camp, etc.  I LOVED Girl Scout camp- who remembers the Squirmy the worm song?!  One thing I learned through working with the Girl Scouts on this recipe is about their Cookies for a Cause program.  Part of the cookie-selling process allows girls to sell boxes of cookies that are put aside to be donated to soldiers overseas or to local food pantries.  What an awesome way to use this well-known project for good.

Girl Scout cookies are $4 a box, and you can visit www.hergirlscouts.com, click on "cookie locator" and enter your zip code to find out where you can buy cookies in your area.

Here's the recipe for Thin Mint Gooey Cake Bars.  Comment below if you try these or have other Girl Scout cookie-inspired recipes!

Need:
1 Yellow Cake Mix
1 stick of softened unsalted butter
1 large egg
1 cup chocolate chips
1 cup Andes Candy mint pieces
1 small can sweetened condensed milk
20 Girl Scout Thin Mint cookies broken into pieces

Do: 
Preheat oven to 350F and coat a 9x13" baking dish with non-stick cooking spray (I always use canola oil spray).

Mix cake mix, butter and egg in a large bowl.  Press dough into the bottom of the prepared baking dish.  Top evenly with chocolate chips and Andes candies.  Pour condensed milk over dough and top with broken pieces of Thin Mint cookies.

Bake for 30-35 minutes until baked through.  Let cool completely.  Cut into squares and serve.

Pat dough in pan
Add chocolate chips
Add Andes candies
Pour on condensed milk
Top with cookie crumbles!
Bake and enjoy!
Disclaimer:  This is a (semi) sponsored post.   The Girl Scouts reached out to me asking if I would be willing to try out and feature a fun new recipe using Girl Scout cookies if they sent me the cookies for free.  I happily agreed, being a Girl Scout alum and cookie lover!  The only benefit I got for this post was the box of free cookies (and fun new recipe.)  All other supplies were purchased by me, and the honest opinions expressed in this post are all my own.

Thursday, December 13, 2012

Peanut Butter Blossoms - Guest Post!

Today's guest post is written by my good friend Cheryl.  Cheryl was actually my boss for three years at my very first job out of college, and we've kept in touch since then.  We have the most fun going on weekend adventures and girls nights out - she is wild and crazy fun, not to mention very talented in the kitchen!  Thanks for sharing your family recipe, Cheryl!!

---


When I was a little girl my Grandma Webster made Peanut Butter Blossoms every Christmas, and we had them in our home during the holidays as well. My mom adopted the recipe long before I was born as one of four cookies she made annually at Christmas time.

My grandmother baked for a living, or I should say for extra money when my grandfather retired. Everything she made was deliciously moist and she never needed a recipe. She had all her recipes memorized!

I secretly think she started selling her baked goods because it allowed her time away from grandpa when he retired. Mind you, she did all her baking out of her home so she never truly got away from him, in fact he began helping her when orders started to climb and she couldn't keep up. It grew a wonderful business and partnership between the two of them.

Often during the holiday season when orders grew my mom would spend the day helping out. My siblings and I of course came along for the ride. The smells in their home were divine.

For this reason, I continue the tradition today to keep those memories alive. Instead of with my grandmother, I now share this tradition with my husband Mike.

Need:
1 cup of peanut butter (Jiff works best)
1 cup sugar
1 cup of brown sugar
1 cup of Butter
2 eggs
4 tbsp of milk
2 tsp vanilla extract
2 3/4 cup of flour
2 tsp baking powder
1 tsp of salt

Do:
Mix butter, peanut butter, and sugars until mixed together and batter is uniform. Then add eggs, milk and vanilla. Then add dry ingredients to a medium size bowl - blend them and slowly add this flour mixture to the butter/sugar mixture.

Refrigerate for one hour or overnight or even better results. Pre-heat oven to 375 degrees F. Bake on non- greased baking sheets 8-9 minutes. Remove from sheet immediately and add kisses or peanut butter cups while cookies are still hot, this way the chocolate melts into the cookie. Makes 75 cookies.

Tuesday, December 11, 2012

Italian Anise Cookies

Hi everyone! Nice to meet you, I feel like I know you all since my wifey (aka Boston Sweetie) tends to drop my name in a post every now and then (aka "Hubs"). You can call me Boston Sweetie Hubs or
B-hubs for short.

I am not ashamed to say that the 25 days of Christmas this year has made one of the most delicious Decembers that I can remember. Tonight, I decided to keep the daily trend going with one of my favorite types of cookies - Anise! Inspired by some of my favorite North End bakeries like Bovas, Mike's and Modern - I decided to save myself the walk and make my own.

After browsing a few recipes online to inspire myself, I found the one - look no further than Food.com.

Check out the picture of my finished product below - they look good huh?

HoHoHo these look good!
The recipe consisted of two parts - Making the cookie batter and making the icing - which gave me two bowls of extra batter bits to eat....

Anyways....

The first part consisted of mixing a stick of butter, eggs, sugar, anise, and milk- to create a nice anise fluffy sugar mixture which now needed some flour mixture. The flour mixture consisted of some baking powder and ....Flour! After about 10 minutes of mixing with the magic of the Kitchen Aid - we had some nice fluffy anise cookie batter.  Using a cookie scooper to portion - I created some nice round dollops of cookie batter and into the oven they went.  Ten minutes they were done.

The finishing touch was a mixture of confectionary sugar, milk and a drop of anise for the glaze. Simply take the baked cookies and dip them into the glaze, finish with sprinkles and we have Anise cookies!

Merry Christmas!
Only 14 more days 'til Christmas everyone- enjoy the cookies and I'm sure I'll be speaking to you soon again.

You can access the recipe here.

Bye for now,
B-hubs

Monday, December 10, 2012

Chocolate Cranberry Oatmeal Cookies

After a full week of having cookies every single day, I guess it's to be expected that I'd have a "fat" day around now.  Ever felt that way?  I battled it by doing a killer spin class at the gym tonight, making a dinner found on one of my favorite blogs (Skinnytaste.com) and then choosing a recipe from WeightWatchers.com for tonight's cookie.  It's healthy, see?!

Look at all those oats!!

Well, actually, it's not that healthy.  There's tons of sugar and a stick and a half of butter, but that's what makes cookies so delicious.  The main ingredient is oats, and oats fill you up, so at least you will eat less cookies before feeling totally satisfied.

What I love about this recipe is the cocoa mixed into the flour portion.  It helps work on that chocolate craving without being packed with chocolate chips.  What I don't love about this recipe is how much the dough expands when you bake them.  They spread waaaaaay out, so space out your dough accordingly.


Check out the original recipe here.  I swapped Craisins for dried cranberries and love the final cookie.  It's a thin, chewy, delicious and healthy-tasting treat, perfect for a feeling-fat-Monday.

Have a great week, Sweets!

Friday, December 7, 2012

Soft & Chewy Chocolate Drops with Hot Cocoa Frosting - Guest Post!


Today's post is written by my good friend Heather.  Heather and I were coworkers at my first "real" job, and then neighbors for two years.  Heather is a die-hard-"Michigander" (Go Blue!) and is an excellent running buddy.  She also makes the BEST Heath Bar Angel Food cake you will ever eat, so hopefully I will get her to share that one day, too.  I happen to know that Heather brought these into work and they were a huge hit.  One coworker who avoids butter like the plague couldn't even resist!  Thank you for sharing your cookies, Heather!!

---

Double-chocolate soft & chewy cookies


I've been craving a chocolate cookie and had one in mind that my mom made once years ago.  She couldn't find the recipe so I used the one on the back of the Bakers Unsweetened baking chocolate box.  You will need:

4 squares Bakers' Unsweetened Chocolate
3/4 cup butter (1.5 sticks)
2 cups sugar
3 eggs
1 tsp vanilla
2.5 cups flour

Dough with flour added
Heat oven to 350F.  Microwave unsweetened chocolate and butter in large bowl on high for 2 minutes (or until butter is melted - mine took more like 3 minutes).  Stir until chocolate is completely melted.  Add sugar and mix well.  Blend in eggs and vanilla.  Stir in flour.  (Do not over mix).  Refrigerate 1 hour or until dough is easy to handle.  (I was impatient and just refrigerated for 20-30 minutes.)

Shape into 1-inch balls (highly recommended - they keep their shape so just dropping them on the baking sheet makes them look yucky - too ugly to take to work!)

Balls of cookie dough
Bake 8 minutes or just until set (I let mine bake for 10 - they didn't look done after 8 minutes).  Let stand on baking sheet for 1 minute (if you don't wait the bottom falls out - at least that's what happened to me!  I'm going to fill it with frosting.)  Transfer to wire rack to cool completely.  This yields 5 dozen cookies (I got 61).

Baked cookies
Frosting!

I planned on using the recipe on the back of Hershey's Unsweetened cocoa but didn't think I had enough powdered sugar so I used hot cocoa mix that's mostly powdered sugar.

Hot Cocoa Frosting

1/4 cup of butter (1/2 stick)
Splash of milk (I used roughly half of a 1/3 cup)
1 3/4 cups hot cocoa mix (see below for recipe)

Melt butter.  Add hot cocoa mix and milk.  I mixed with a fork and it was really lumpy so I brought out my mixer to smooth it out a bit.  Still wasn't super smooth (see below).  The taste makes up for the lumps! :)

Lumpy but delicious frosting
Cocoa Mix (makes a whole bunch!!)

11 oz. jar non-dairy creamer
3 cups plus a little powdered sugar
2 cups Nestle Quick
1 1/3 cups non-fat dry powdered milk (enough for a quart of "milk")

Mix all ingredients together and store in an air tight container.  (Use 4 heaping tablespoons per cup of boiling water for actual cocoa.)

Thursday, December 6, 2012

Italian Ricotta Cookies

It's day 5 of my 25 Days of Cookies series, what do you all think so far?!

Today's cookie is one I tried at work.  My cube-mate Stephanie of Just Us Gals blog brought these in to share with the office.  She broke them out nice and early, and I hoarded them at our desk until I could take a couple pictures (and a couple cookies for myself, hah!)


These are great; ingredients are simple and you likely have almost everything you need at home, and they aren't overly sweet so you can have them for breakfast like I did, or dessert.  The cookies come together quickly, and the following recipe makes about 6 dozen.  If you can't see yourself eating that many cookies, bring the extras to work.  Your coworkers will love you, trust me!


Italian Ricotta Cookies
Baked by Stephanie's roommate, Hayley
Recipe by Hayley's friend Liz' grandmother who is from Italy
Thank you to both Hayley and Liz for sharing your cookies and your recipe!!

Blend 2 sticks of margarine, 2 cups of sugar and 15oz of ricotta cheese.  Add 2 beaten eggs, 2 tsp. of vanilla, 4 cups of four, 1 tsp of baking soda, and 1 tsp of salt.  Drop by teaspoon on a cookie sheet.  Bake at 350F for about 15 minutes or until the bottoms are brown. 

The original recipe calls for an icing glaze made by mixing powdered sugar and slowly mixing in nonfat milk until the powdered sugar turns into a thick liquid.  Drizzle the glaze on top of the cookies once they have cooled, then sprinkle with coconut shavings.  If you don't like coconut, powdered sugar on top (like the ones pictured) tastes great too!


Wednesday, December 5, 2012

Double Chocolate Mint Chip Chewies

Happy Hump Day, Sweets!

If you like Girl Scout Thin Mints, tonight's cookie is for you.  It's a fudgy, rich chocolate cookie studded with seasonal Mint M&M's.  Same flavor as Thin Mints, but less crunch and more chew.  De-lish.


In my latest trip to the food store, I just couldn't resist the sassy minty M&M on the baking endcap.  I mean, look at her! I had initially thought I'd do a plain sugar cookie and put the M&M's in those, similar to the Keebler kind my mom gave me growing up.  But then I thought about the sugar cookies we had last night and how I love chocolate and it dawned on me that it's a good idea to mix chocolate and mint.


I really love this chocolate cookie, and the red, green and white M&M's make them look so festive.  This is definitely another recipe on the favorites list for 2012 Christmas cookies.  If you make your own batch, let me know how they come out!


Side-note - the cookie dough for these is excellent too!  But don't eat too much; raw eggs are no good. 

Need:
1 1/4 c. unsalted butter
2 c. flour
1 c. brown sugar
3/4 c. white sugar
3/4 c. dutch process cocoa
2 tsp. vanilla
1 tsp. salt
2 large eggs 
1 tsp. baking soda
1 1/2 cups Mint M&Ms

Do:
  1. Preheat oven to 350F.
  2. In a small bowl, whisk cocoa, salt and baking soda to combine.  Put to the side.
  3. In a mixing bowl fitted with the beater attachment, cream the butter, brown sugar and white sugar until well mixed. 
  4. Add one egg, mix well, then add the other egg and continue to mix well.
  5. Add in vanilla, continue to mix.
  6. Pause the mixer, and add the cocoa/salt/baking soda mixture.  Start mixer on slow to combine, then beat well.
  7. Again, pause the mixer and add in the flour.  Start mixer on slow to combine, then beat well.
  8. Mix in M&M's by hand
  9. Using a 1-tbsp cookie scoop, portion out the cookies onto a sheet lined with parchment paper.
  10. Bake for 9 minutes
  11. It would probably be a good idea to cool these on a cooling rack, but since I don't have one, I just put them immediately on a plate.  Enjoy!


Tuesday, December 4, 2012

Caramel-filled Sugar Cookies

Caramel and sugar- the perfect addition to a regular ol' Tuesday.  Tonight my husband shares with you another treat that he baked!  Two batches in one week?  I really found the right man.


I was off at Tuesday Night Dinner with my college sorority sisters tonight, and came home to these chewy cookies, nice and warm out of the oven.  J looked at what we had in the cabinet and found a recipe to try on his own.  His creation is a delicious, perfectly- but not overly-sweet sugar cookie, with a caramel center. I had bought the caramels a few weeks back with the intent of making a caramel apple pie.  That never happened, so I'm glad he used them for some cookies tonight!


When I asked J if he made any tweaks to the recipe or if he followed it exactly, the answer was:

"Ummm......

.............. I probably put a little more butter... a little more sugar...."  (cue puppy dog eyes)

Those ingredients never killed anyone!  Besides those two liberties, I think he followed the recipe pretty closely, so you can check that out here on Barbara Bakes to try these out.


PS - for my faithful readers who remember my old Tuesday Night Dinner posts; here's an update on tonight!  Shannon was on dessert duty and brought some chocolate chip cookies and vanilla fro-yo.  Lindsay served them on the cutest owl plates ever, sent up to Boston from her mom who knew they were a must-have for our TND tradition.  This dessert tastes really, REALLY good with some Alamos Malbec from Argentina, in case you were wondering.  (I was on wine duty!)

TND Dessert - I even got a Kappa Green owl plate - thank you Barb! xoxo

Monday, December 3, 2012

Mocha Chip Meringue Cookies

25 Days of Cookies, Day 2.

After a very long day at work, and with the thought of the very busy week ahead I knew tonight's cookies had to be easy.  And delicious.  Because a long day calls for a delicious cookie...or five.  Yup...five.


I googled "easiest cookies ever" and found my favorite, Martha Stewart.  Of course the queen of domesticity has a list of the easiest cookie recipes on her website (great list, btw!).  I decided to go with mocha-chip meringues because I had all of the ingredients, I love mocha flavor, and I've never made meringue cookies before.

The quality of cookie you get for the amount of work you need to put in is in-SANE.  Right out of the oven, these are like mini molten cookies- super delicate crispy shell and warm, gooey, chocolately inside.  I cannot wait to see what they taste like tomorrow when they've cooled.


I know I have a lot more cookies to go this month, but these are a must try.  Really.

I followed Martha's recipe almost exactly, you can find it here.  I didn't have espresso powder, so I used a teaspoon and a half of coffee out of a K-cup I had on hand.

Are you a meringue fan?  Tell me your favorite meringue cookie in the comments below.  I've seen coconut, mint chocolate, and this mocha version.  Now I know the mocha is so good, I think I can't wait to try more flavors.

Sunday, December 2, 2012

25 Days of Cookies!

Hello Sweets!  It's been way too long, I'm sorry for going off the grid for the past few months!  My husband and I moved into the city and while that has been beyond amazing, the tragedy of the move was leaving almost all of my baking pans in the old apartment!  The only things that came with me were a bread pan, 2 round cake pans and 1 very small cookie sheet.  It has been a nice break from baking and I think I've lost a little weight because of it (woohoo!) but with Christmas approaching, the bug is back.

I decided to bring BostonSweetie back to life with a promise to do a post a day from now through December 26.  Each of these posts will be about one of my favorite treats- cookies!


The first cookie I have to share with you is a classic chocolate chip recipe that I've been baking with my mom since as far back as I can remember.  This was our cookie that we made for Santa, gave to the neighbors, and ate with milk while watching Rudolph and Frosty.  I've always loved them straight out of the oven, nice and hot, but these are sooo good the next day, too!  These whip up fast and bake fast too- so they are an excellent choice for a quick turnaround.


The special thing about this exact batch that I'm showing you, is that my husband made them!  It took him about 10 minutes to get the dough mixed up and then 10 more minutes to bake.  He is the best!

I don't know what cookbook it comes from- it's a really old photocopy that my mom has had forever, so if someone recognizes it from the photo, please let me know and I'll attribute the recipe accordingly.


If you try this recipe, let me know how you liked it in the comments below.  And if you have suggestions for a cookie recipe I should try this month, please share that below, too!
Mum's handwriting on the recipe - too bad I left all my cooling racks at the apartment too!  If anyone is in the same boat, a plate works just fine :)

Monday, December 12, 2011

White Chocolate Cherry Shorbread Cookies

When I think Christmas cookies, I think of pretty, festive, and most importantly, delicious bite-sized treats-- and that's just what these little pink cookies are!


I recently took place in the first annual Great Food Blogger Cookie Swap, where food bloggers bake and send a dozen cookies out to three bloggers, and in return, you receive a dozen cookies from three other bloggers.  Needless to say, my husband thinks this is the greatest blogging project I've ever participated in!  I loved it for the fun of receiving three packages of treats, and finding six new food blogs to read!


Choosing which cookie to make was not as easy as I thought it would be.  I'm inspired daily by others' creations that I see on Pinterest, and I changed my mind four or five times before deciding on these, but in the end I think I picked the right cookie!  They're small, chewy, cheery pink and cherry-flavored with festive white chocolate and red sprinkles.  I sent off three pink cookies jars full off to Stephanie at Okie Dokie Artichokie, Erin at The Spiffy Cookie, and Allison at Allison Eats.


In return, I received almond crescent cookies from Return to Sunday Supper, Snickers Surprise cookies from Lindsay at The Little Foodie and gluten-free Chai Snickerdoodles from Catherine at Munchie Musings.  They were all delicious- and I thank you all so much for your generosity, and beautiful packaging!!!

For anyone who thinks these shortbread cookies have a place on your holiday table, the recipe is fairly easy, though time-consuming if you make lots of little cookies like I did.  For a quicker turnaround, I'd suggest making fewer, bigger sized cookies.


And for any fellow food bloggers who missed out on the swap this year, you can sign up here to get notifications for next year's swap!

Happy Holidays!


White Chocolate Cherry Shortbread Cookies
Adapted from Better Homes & Gardens

Need:

  • 1/2 Cup Maraschino cherries 
  • 2-4 tbsp. of juice from the cherry jar
  • 2 1/2 cups flour
  • 1/2 cup sugar
  • 2 sticks cold butter
  • 1 package of white chocolate chips - chopped in processor or by hand
  • 1/2 tsp. almond extract
  • 2 tsp. shortening
  • Red sprinkles (or any kind of sprinkle you'd like)
Do:

  • Preheat oven to 325 degrees.
  • Chop the cherries (stems removed) in a food processor as finely as possible; you can also chop them by hand but I love the speed and ease of the processor.  Pour the cherries and their juice (add 2-4 extra tablespoons of juice from the jar to the bowl as well- use two for color, four for color and flavor.)
  • Mix the flour and sugar in a large bowl, and then using a pastry cutter or two knives, cut in the butter until it is combined into a crumbly mixture.  I WRECKED my pastry cutter doing this- my butter may have been too cold- just a heads up to be careful!
  • Stir in cherries, cherry juice, 2/3 cup of white chocolate bits, and almond extract.  Knead all ingredients together and form a nice smooth doughy ball.
  • Shape dough into 3/4 inch balls (if you want to make LOTS!) or 1 - 1.5 inch balls for bigger cookies.
  • Place each ball 2 inches apart on an ungreased cookie sheet.  Take a water glass, dip the bottom in water and then into sugar to coat it.  Smush the balls of dough into thin discs with the sugar-coated cup. 
  • Bake for 10-12 minutes, cool 1 minute on the cookie sheet and then move to wire racks to cool completely.
  • When all the cookies are cooled, mix the rest of the white chocolate with the shortening in a small saucepan.  Stir over low heat until melted and combined.
  • Dip half of each cookies into the chocolate and let the extra drip off, or scrape it off with a spatula or spoon.  While the white chocolate is still wet, roll the edge through the sprinkles to decorate. 

Tuesday, October 4, 2011

Sunday Macaron, take 2!


What to do on a lazy Sunday with a bowl full of icing and an itch to bake?  Whip up some french macarons, of course!  I put together some almond flavored cookies with a touch of lemon, stuffed them with almond flavored icing and voi la, pretty!

If you're looking for the recipe, check out my initial post here.  Don't be intimidated; they're easy!  Here's a step by step.

Step 1: Whip up some old (I mean it!) egg whites and some superfine sugar.


Step 2:  Go to town sifting up almond flour and confectioner's sugar

Step 3:  Take eggs, sift flour on top one more time, add some food color and flavoring, and stir 'til shiny.

Step 4:  Pipe circles onto some parchment paper (or silpat mats if you're fancy like that.)


Step 5:  Bake for about 10 minutes, let cool for 10 more, pipe on your filling of choice, smush together, and enjoy some pretty french cookies!