Saturday, December 22, 2012

Gluten-Free Nutella-Stuffed Brown Butter Sea Salt Chocolate Chip Cookies - Guest Post!


Today's guest post is by my friend Dori from OKnLA.  Dori and I worked on the same team but in different cities at a marketing/project management agency.  She is living the life, meeting celebs, kicking butt and taking names out in Los Angeles.  I miss working with Dori, but love keeping in touch and reading about her adventures!

---

Hello!  I'm Doriean and I blog over at oknla.blogspot.com.  Normally my blogs consist of album covers, music opinions and images of my life in Los Angeles.  But today, because Stacey was so great to ask me, I'm sharing a baking post!

I love baking.  Since I moved to my current place (a guest room off of my friends' garage) I haven't been able to bake much because I don't have my own kitchen anymore.  I didn't think I would miss it much, but I do!  So any excuse to bake is a good one.

This picture is from Ambitious Kitchen's blog- she has beautiful photography.  This is what the finished cookies should look like!
I've wanted to try this recipe from Ambitious Kitchen for a while with one twist; I wanted to make them gluten-free.  I don't have a gluten allergy, but I've found my body feels so much better when I avoid gluten.  So lately I've been doing my best to go gluten-free, meaning I use a different kind of flour.


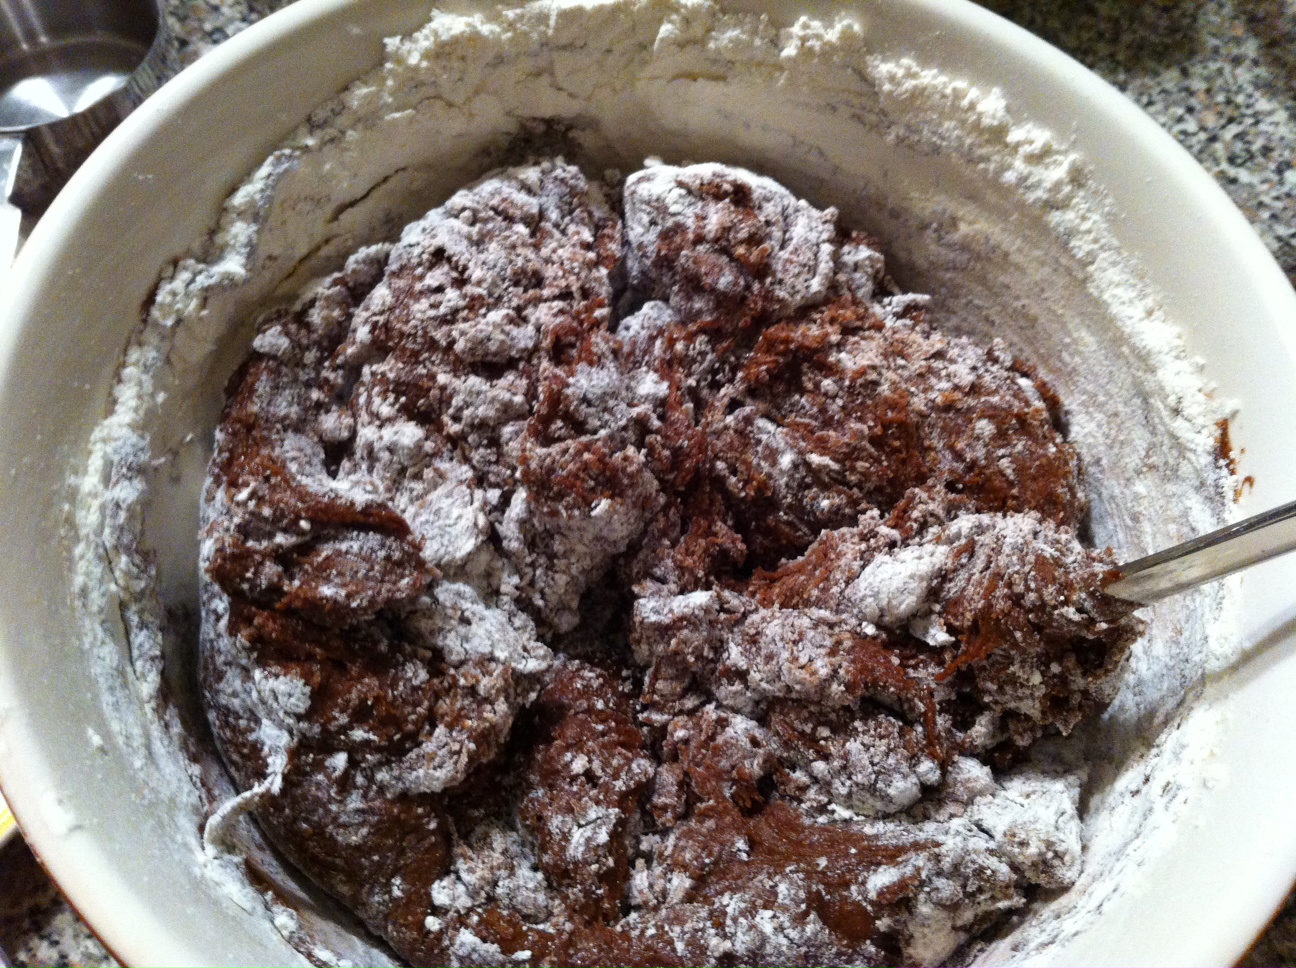
My favorite part about making these cookies was melting the butter.  Okay, I'm lying.  My favorite part was the Nutella.  I love Nutella.  Whoever created Nutella should receive a medal.  Or a shrine.  Nutella is the most amazing spread and it's a wonderful addition to a cookie.


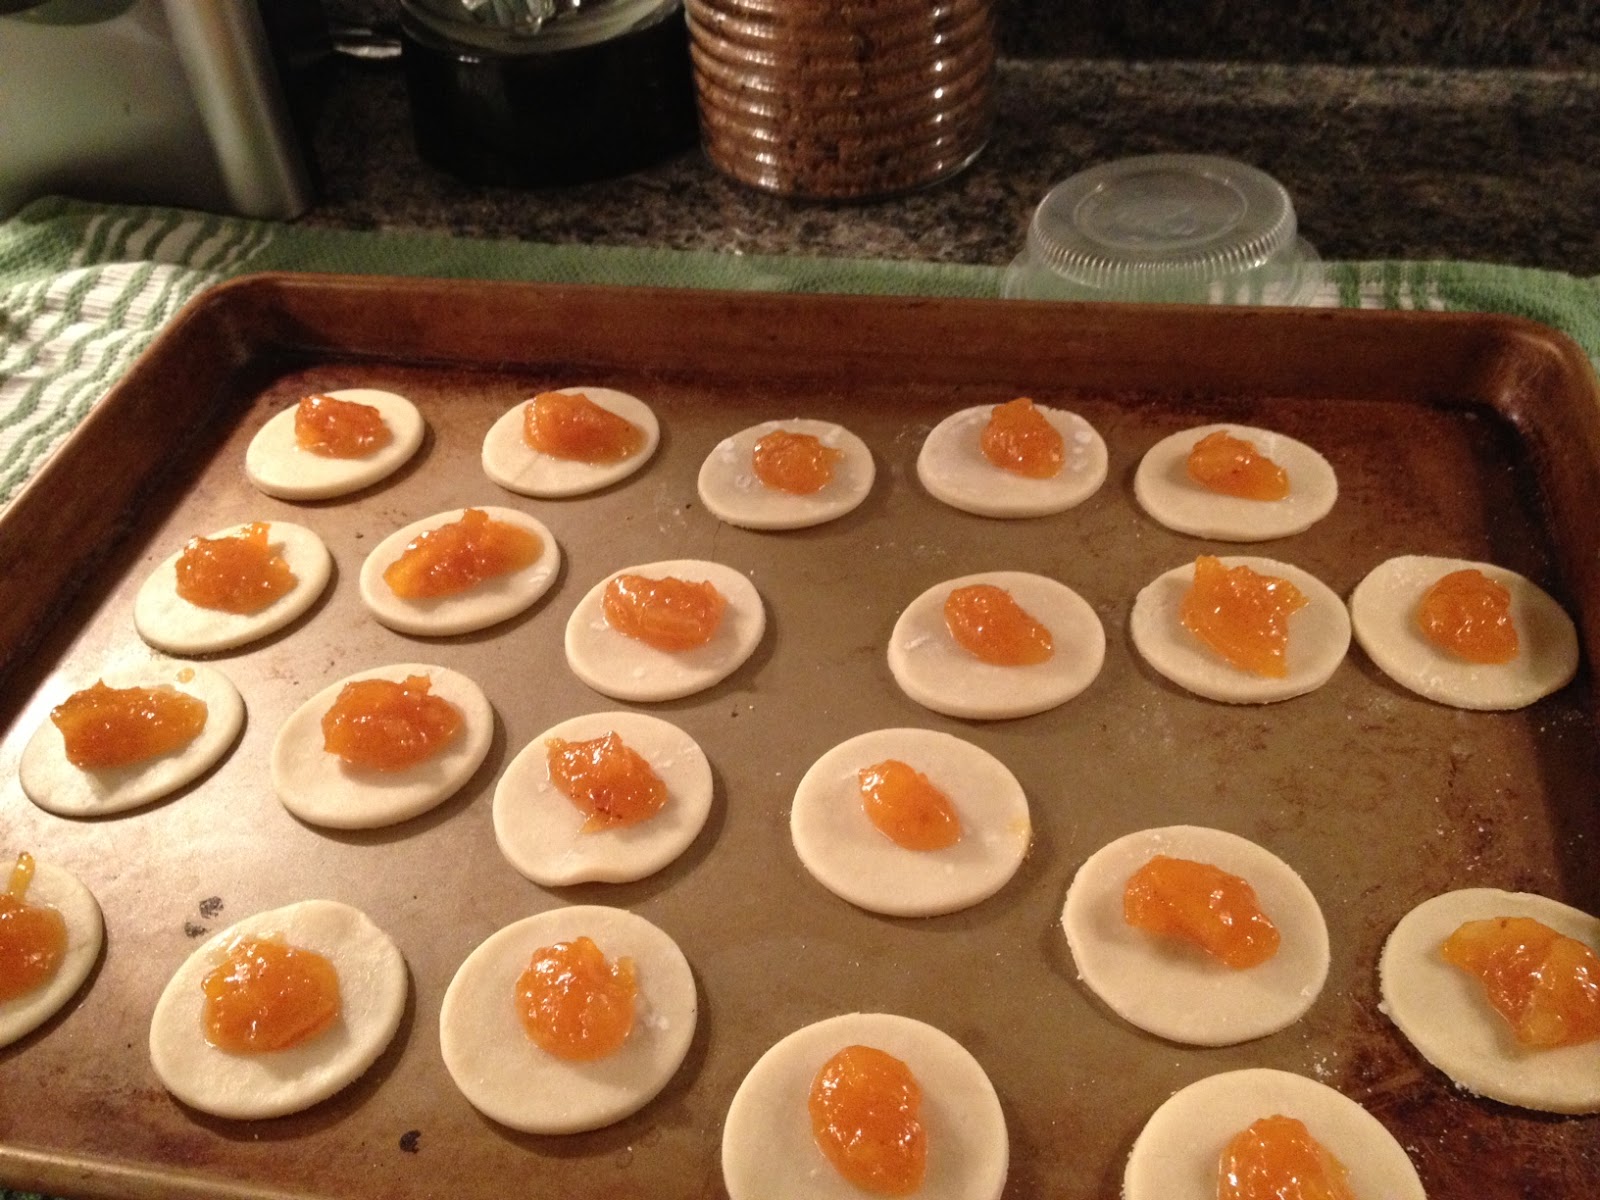
But back to the butter.  Usually when I make cookies I let butter reach room temperature.  But this recipe required melting the butter in a saucepan, and I love the way that move increases the buttery flavor of the cookies.  The rest of the steps to making these cookies are pretty typical, except that you should leave the dough in the refrigerator for at least two hour before baking so that the ingredients mingle and set.  Once that happens, you roll the dough into cookie dough balls, flatten the balls, grab a spoonful of Nutella, eat it.  Then grab another spoonful and plop it into the flattened dough ball.  Recreate the ball so that there's no Nutella poking out and then place it on the cookie sheet.  Fill your sheet and bake those puppies!

Now, gluten is one of the main things that make things like bread, muffins and cookies rise.  Without it, these items come out flat and not as picture perfect.  But they still taste yummy!  So if you're using gluten-free flour like I did, know that these cookies will be really flat.  But I promise, even though they're not picture perfect, they are for sure tummy perfect.


Thanks for reading!  Eat something yummy today, even if it's not gluten free.


Friday, December 21, 2012

Chocolate Rum Balls

"Hey Kid, do you like rum?"

"What's rum?  Rumplestilskin??"

Does anyone else love Big Daddy as much as I do?  So funny.  I can't have rum without quoting that line.


Anyway, tonight's cookie is something new to me- rum balls!  These were recommended by my husband's coworker.  They're an awesome no-bake, extremely rummy (har har) treat.  The dough is a cinch to put together, the rolling takes a bit more time.  These would be a hit for any chocolate and rum fans.  Like me. love love love.  Warning, despite only using 1/4 cup of alcohol, these definitely have a kick and should be enjoyed by adults only.

Here's the recipe:

Crush up 1 box of Nilla Wafer cookies, and put them in a large bowl.  Then, add the following ingredients and mix well:

  • 2 tablespoons of cocoa 
  • 1 cup of chopped walnuts
  • 1 cup of confectioner's sugar
  • 4 tablespoons of honey
  • 1/4 cup of rum
All you have to do now is roll the dough into bite-sized balls, and if you prefer, coat them in extra confectioner's sugar like I did.  I put mine in the fridge to firm up, and these can be frozen as well.  They are fine at room temperature if you don't have space in the fridge. 

Let me know in the comments below if you have your own version of Rum Ball cookies- I'd love to try some other recipes for these!


Thursday, December 20, 2012

Kolazcky Cookies - Guest Post!

Today's guest post is by my favorite baking buddy, Christina of All's Fare Food blog!  Christina and I are Cupcake Camp buddies every year, and love to bake together while our hubbies watch football.  Whenever the four of us go out to dinner, we all go home with sore cheeks because we have so much fun and laugh so hard.  Christina is a great friend and an excellent baker, so here we go!

---


Hello to all the readers of Boston Sweetie’s blog! I’m so happy to have been invited here to share a cookie recipe during this holiday season.

Growing up in the huge Midwest melting pot that is Milwaukee, I had the great privilege to be around all different types of ethnic foods. Each summer on the shores of Lake Michigan, you could flock to one of the weekly ethnic festivals like Irish Fest, Festa Italiana, German Fest or Polish Fest. At these weekend-long events, you could experience snacks and meals with an authentic touch from the old country.

One of my favorite recipes that could be found in many of Milwaukee’s southside bakeries is the Kolaczky Cookie. Pronounced coh-latch-key, this Polish cookie is flaky and filled with a fruity jam.  Several other European countries have their own version of the kolaczky with names like kolache, kolacky or kolace and can be filled with everything from sweet fruit to savory cheeses.

The kolaczky is actually quite easy to make. First, select your favorite filling – I opted for an orange marmalade that I found on the shelves at Home Goods one day. Then, mix together the dough, which is super simple to make. Finally, put the cookies together and bake. In about two hours, you can have more than two dozen of these wonderful cookie treats.


Orange Apricot Marmalade
I hope you enjoy!

What You’ll Need

  • 4 oz (1/2 brick) cream cheese, softened
  • 6 oz (1 1/2 sticks) butter, softened
  • 1 1/2 C all-purpose flour
  • 1 jar filling of choice (apricot, raspberry, strawberry preserves or jam etc.)
  • Confectioners’ sugar for dusting

Putting It Together

Beat the cream cheese and butter together until fluffy. Add in the flour a 1/4-cup at a time. Mix well. Cover the dough with plastic wrap. Chill in the fridge for at least 1 hour.


Preheat oven to 350 degrees.

On your work surface, use a mixture of granulated and powdered sugar to prepare the dough. Do not use flour here.

Roll out your dough to about 1/4-inch thick using a rolling pin. Add more of the sugar mixture if it gets too sticky.

Using a circle or square cookie cutter, cut into 2-inch shapes and place on cookie sheet.


Add about 1/4-teaspoon of filling to the center of the dough. Overlap opposite corners of the dough to cover the filling.


Bake for about 15 minutes until golden brown. Then, remove to a cooling rack.

When cooled, dust with powdered sugar and serve. Store in airtight container.


Wednesday, December 19, 2012

Mint-stuffed Sugar Cookies

Tonight's cookie is a little "semi-homemade" treat that I'm brining to my sister's graduation party tomorrow night.  I am so proud of her and all I can think about is how my little sister is a nurse! I had a lot to do tonight and not too much time to get creative, so I did a spin-off of a recent recipe I saw on Pinterest.


These cookies are just store-bought sugar cookie dough and junior mints with sprinkles.  That. is. it.  They taste great too, I love the combination of vanilla, chocolate and peppermint.  Tasty and festive and pretty to look at, too!


I had to do some experimenting with the baking times and for me the trick was 7 and a half minutes (yes, 7 was too short and 8 was too long) at 325 degrees.  

Besides Junior Mints, you could probably stick any mini-candy in the middle of these and they'd come out good.


Have a good week, Sweets!

Need:
1 log of store-bought sugar cookie dough
2 boxes of Junior Mints

Do:  
1.  Preheat oven to 325F.
2.  Cut the log into 1/2" slices, and quarter each slice
3.  Flatten one of the dough corners in your hand, place a candy in the middle, and roll the dough around it into a ball
4.  Dip the cookie ball into sprinkles 
5.  Bake a cookie sheet for 7 minutes.  If they seem too soft, try another 30 seconds to a full minute.


Tuesday, December 18, 2012

Bacon & Oatmeal Dried Fruit Cookies - Guest Post!

Today's guest post is written by my sorority sister Amy who lives in NYC with her husband Zach.  Amy is an incredible woman and an amazing friend.  We lucked out with this post as she is not often a baker.  She is, however, a really great chef and is excellent at incorporating bacon into everything, from cookies to vodka!  Enjoy!

---
Zach with the freshly baked cookies
Zach's work was having a bake sale at to benefit victims of Hurricane Sandy, so I once again made Bacon and Oatmeal and Dried Fruit Cookies. I originally found these in a magazine and snipped out the recipe for its incorporation of bacon. Side note: they do not come off as very oatmeal-y, since I had a friend who does not like oatmeal cookies inhale one and then state her aversion to oatmeal. These cookies are awesome because they taste like breakfast as a cookie-- sweet and salty! In fact, they sold out immediately from the bake sale and Zach's boss had to have a talk with him about how if he ever brings bacon cookies to the office building again, the cookies need to first stop in the boss's office!

The original recipe calls for raisins, but since I am not a raisin fan, I substituted a dried berry mix which includes cranberries, blueberries, currants, and golden raisins. You can use any dried fruit here that strikes your fancy.


Ingredients 
  • 8 ounces sliced bacon 
  • 2 1/4 cups cake flour 
  • 1 teaspoon baking powder 
  • 1 teaspoon kosher salt 
  • 1/2 teaspoon baking soda 
  • 1/2 teaspoon nutmeg 
  • 1/2 teaspoon cinnamon 
  • 1 cup (packed) dark brown sugar 
  • 2/3 cup sugar 
  • 1/2 cup (1 stick) unsalted butter, room temperature 
  • 2 large eggs 
  • 1 teaspoon vanilla extract 
  • 1 cup old-fashioned oats 
  • 2/3 cup dried fruit (chopped to the size of raisins if applicable)

The Work

The process is simple. I chose to make the bacon on a rack over a cookie sheet in the oven so that they crisped evenly; I was able to crumble the bacon right into the batter at the end with the oatmeal and dried fruit, plus I had the added bonus of having a pool of bacon fat to use later on.

Once the bacon is cooking, I start whisking together the dry ingredients mix in a mixing bowl: 2 1/4 cups cake flour, 1 teaspoon baking powder, 1/2 teaspoon baking soda, 1/2 teaspoon nutmeg, 1/2 teaspoon cinnamon, and 1 teaspoon kosher salt. Keep this dry mixture on the side for a bit. Then, you start creaming together the butter and both sugars in a mixer. Give that a few minutes before adding in two eggs, one at a time.

Then add in the vanilla- the original recipe calls for 1/2 teaspoon, but feel free to amp that up; I sure did. Keep the mixer moving-- you are going for a pale and fluffy batter look. Once that is achieved add in the flour mixture from before, little by little until well-incorporated. Then you can turn off the mixer.

After that, you are practically done with the prep. It is time to add in the oatmeal and dried fruit and crumble in the cooled bacon and fold. This recipe calls for chilling the dough: make 1/4 cup scoops of the batter onto two parchment lined cookie sheets (well spaced), cover w/plastic wrap, and chill for at least an hour, but I tend to let it go overnight.

When it comes time to bake the cookies, just preheat the oven to 375 degrees. Bake cookies for 20-22 minutes and cool first for 10 minutes on their sheets and then move to racks to cool completely. Remember to first put aside cookies for your significant other and boss and then enjoy the rest of the batch! Delicious.

Original Source: http://www.bonappetit.com/recipes/2012/03/bacon-oatmeal-and-raisin-cookies

Sunday, December 16, 2012

Thin Mint Gooey Cake Bars

Hi Sweets, guess what?  I'm baaaack!  I hope you enjoyed the posts from Cheryl and my Jake the past few days!  "B-hubs" as he likes to call him has really been on a baking roll lately, I love it!


Tonight I am excited to share a brand new recipe with you - Thin Mint Gooey Cake Bars!  Yes, I took cookies that are pretty amazing and made an even BETTER cookie, by adding chocolate, Andes candies, and my favorite, cake!

This recipe (and the Thin Mints I used) were shared with me by the Girl Scouts of Eastern MA.  I was so excited to try out the bar cookies to bring to a family Christmas dinner tonight, and they were a hit! The title of "bars" makes you think of brownie-sized bars.  Word to the wise; quarter those squares!  This recipe turns out super delicious, but super SUPER rich.  Like, way too rich for even the biggest sweet lover to eat a whole square.  When cut up into bite-size mini squares, it's the perfect cookie-size portion.

The title tells it all- there's plenty of minty chocolate and lots of delicious (and surprisingly un-messy) 'gooey' atop a buttery yellow cake crust. So good!

The best part is that one of the ingredients you need to make these cookie bars is the Thin Mint cookies themselves.  Now that it's officially Girl Scout cookie time, it's perfect timing to try these out for a holiday gathering.  Cookies are available December 7th through March 12, so keep an eye out for your local Girl Scouts getting their sell on!


When I was a "brownie" and a "junior" Girl Scout, I was always a top seller and had so much fun selling cookies for my Girl Scout troop.  This has been an American tradition for nearly 100 years and all of the proceeds help girls learn important skills while raising funds for leadership activities.  The money helps Girl Scout troops take part in service projects, go on field trips, attend summer camp, etc.  I LOVED Girl Scout camp- who remembers the Squirmy the worm song?!  One thing I learned through working with the Girl Scouts on this recipe is about their Cookies for a Cause program.  Part of the cookie-selling process allows girls to sell boxes of cookies that are put aside to be donated to soldiers overseas or to local food pantries.  What an awesome way to use this well-known project for good.

Girl Scout cookies are $4 a box, and you can visit www.hergirlscouts.com, click on "cookie locator" and enter your zip code to find out where you can buy cookies in your area.

Here's the recipe for Thin Mint Gooey Cake Bars.  Comment below if you try these or have other Girl Scout cookie-inspired recipes!

Need:
1 Yellow Cake Mix
1 stick of softened unsalted butter
1 large egg
1 cup chocolate chips
1 cup Andes Candy mint pieces
1 small can sweetened condensed milk
20 Girl Scout Thin Mint cookies broken into pieces

Do: 
Preheat oven to 350F and coat a 9x13" baking dish with non-stick cooking spray (I always use canola oil spray).

Mix cake mix, butter and egg in a large bowl.  Press dough into the bottom of the prepared baking dish.  Top evenly with chocolate chips and Andes candies.  Pour condensed milk over dough and top with broken pieces of Thin Mint cookies.

Bake for 30-35 minutes until baked through.  Let cool completely.  Cut into squares and serve.

Pat dough in pan
Add chocolate chips
Add Andes candies
Pour on condensed milk
Top with cookie crumbles!
Bake and enjoy!
Disclaimer:  This is a (semi) sponsored post.   The Girl Scouts reached out to me asking if I would be willing to try out and feature a fun new recipe using Girl Scout cookies if they sent me the cookies for free.  I happily agreed, being a Girl Scout alum and cookie lover!  The only benefit I got for this post was the box of free cookies (and fun new recipe.)  All other supplies were purchased by me, and the honest opinions expressed in this post are all my own.

Friday, December 14, 2012

Maple Glazed Donut Hole Cookies

Hi again everyone it's me, the Boston Sweetie husband aka hubs aka B-Hubs.....I know what your thinking and don't worry, BostonSweetie is ok...she has just been busy and luckily I have been on a kick lately of having good cookie ideas.

Growing up I also enjoyed the smell of cinnamon, donuts and french toast. As Frank Sinatra once sang "These are a feeew of my faaaavorite things"...so that's what decided to make - donut hole cookies with maple glaze.

Donut hole cookies by the tree, I'll take that for a present!
After a brief browsing session, I came across Yummly.com . The pictures looked great and I decided to throw my own twist with an extra layer of maple glaze.

First things first -

I added the flour, sugar, baking powder, salt and set aside. Next step - mix butter, sugar, vanilla extra and eggs in the mixing bowl - and then combine flour mixture+sugar butter vanilla eggs mix to create the delicious dense dough.

Last touch - roll the dough in a mixture of sugar and cinnamon and it's time to bake. After 15 minutes in a 350 degree oven - voila- donut hole cookies! ....But wait, there's more - I decided that a glaze to finish would be a nice touch so I threw together some confectionary sugar, milk, slight dab of vanilla extract and some real maple syrup! Tasty enough to make me come up with my own Christmasmas song....
"Deck the halls with balls of donuts cookies...falalala la la la la"

Only 11 more days til Christmas!  Lots of cookies to make for Santa!

It looks even better with an extra dusting of Cinnasugar!


For full recipe details please follow this link.

Talk to you all soon!

Best,
B-Hubs


Thursday, December 13, 2012

Peanut Butter Blossoms - Guest Post!

Today's guest post is written by my good friend Cheryl.  Cheryl was actually my boss for three years at my very first job out of college, and we've kept in touch since then.  We have the most fun going on weekend adventures and girls nights out - she is wild and crazy fun, not to mention very talented in the kitchen!  Thanks for sharing your family recipe, Cheryl!!

---


When I was a little girl my Grandma Webster made Peanut Butter Blossoms every Christmas, and we had them in our home during the holidays as well. My mom adopted the recipe long before I was born as one of four cookies she made annually at Christmas time.

My grandmother baked for a living, or I should say for extra money when my grandfather retired. Everything she made was deliciously moist and she never needed a recipe. She had all her recipes memorized!

I secretly think she started selling her baked goods because it allowed her time away from grandpa when he retired. Mind you, she did all her baking out of her home so she never truly got away from him, in fact he began helping her when orders started to climb and she couldn't keep up. It grew a wonderful business and partnership between the two of them.

Often during the holiday season when orders grew my mom would spend the day helping out. My siblings and I of course came along for the ride. The smells in their home were divine.

For this reason, I continue the tradition today to keep those memories alive. Instead of with my grandmother, I now share this tradition with my husband Mike.

Need:
1 cup of peanut butter (Jiff works best)
1 cup sugar
1 cup of brown sugar
1 cup of Butter
2 eggs
4 tbsp of milk
2 tsp vanilla extract
2 3/4 cup of flour
2 tsp baking powder
1 tsp of salt

Do:
Mix butter, peanut butter, and sugars until mixed together and batter is uniform. Then add eggs, milk and vanilla. Then add dry ingredients to a medium size bowl - blend them and slowly add this flour mixture to the butter/sugar mixture.

Refrigerate for one hour or overnight or even better results. Pre-heat oven to 375 degrees F. Bake on non- greased baking sheets 8-9 minutes. Remove from sheet immediately and add kisses or peanut butter cups while cookies are still hot, this way the chocolate melts into the cookie. Makes 75 cookies.

Wednesday, December 12, 2012

Love Yourself First and Everything Falls Into Line

Today was a long day.  I woke up tired.  Went home (pretty late) from work tired.  Too tired to do the dishes, cook, and barely had the motivation to choose an outfit for tomorrow's work holiday party.  Ever have one of those days, where you're just. so. tired?


Exhaustion tonight lead to Chinese take out for dinner.  Which obviously concludes with a fortune cookie, alleviating me of the baking duties for the night!  Lazy lady's out, I know.. everyone needs a day off now and then, right?


How fitting that my fortune read, "Love yourself first and everything falls into line."  I loved myself first, ordered out instead of cooking, and then they delivered me a cookie.  Everything fell into line!  Really though, the best part of fortune cookies is finding the fortune inside.  This was a pretty good one, but the best, most random one I ever got was:  "More pineapple, please."  I have no idea what that means or why it was on a fortune, but I got it over a decade ago when I was in high school and I've never forgotten it. Anyone else out there have good fortunes that you've never forgotten?


By the way, if you're a Bostonians who need a mid-holiday break from the kitchen, Hong Kong Cafe in Fenway does Chinese take-out right.  Just sayin'!  (They did not ask me to write this, I just really, REALLY liked the food we got tonight!)


Tuesday, December 11, 2012

Italian Anise Cookies

Hi everyone! Nice to meet you, I feel like I know you all since my wifey (aka Boston Sweetie) tends to drop my name in a post every now and then (aka "Hubs"). You can call me Boston Sweetie Hubs or
B-hubs for short.

I am not ashamed to say that the 25 days of Christmas this year has made one of the most delicious Decembers that I can remember. Tonight, I decided to keep the daily trend going with one of my favorite types of cookies - Anise! Inspired by some of my favorite North End bakeries like Bovas, Mike's and Modern - I decided to save myself the walk and make my own.

After browsing a few recipes online to inspire myself, I found the one - look no further than Food.com.

Check out the picture of my finished product below - they look good huh?

HoHoHo these look good!
The recipe consisted of two parts - Making the cookie batter and making the icing - which gave me two bowls of extra batter bits to eat....

Anyways....

The first part consisted of mixing a stick of butter, eggs, sugar, anise, and milk- to create a nice anise fluffy sugar mixture which now needed some flour mixture. The flour mixture consisted of some baking powder and ....Flour! After about 10 minutes of mixing with the magic of the Kitchen Aid - we had some nice fluffy anise cookie batter.  Using a cookie scooper to portion - I created some nice round dollops of cookie batter and into the oven they went.  Ten minutes they were done.

The finishing touch was a mixture of confectionary sugar, milk and a drop of anise for the glaze. Simply take the baked cookies and dip them into the glaze, finish with sprinkles and we have Anise cookies!

Merry Christmas!
Only 14 more days 'til Christmas everyone- enjoy the cookies and I'm sure I'll be speaking to you soon again.

You can access the recipe here.

Bye for now,
B-hubs

Monday, December 10, 2012

Chocolate Cranberry Oatmeal Cookies

After a full week of having cookies every single day, I guess it's to be expected that I'd have a "fat" day around now.  Ever felt that way?  I battled it by doing a killer spin class at the gym tonight, making a dinner found on one of my favorite blogs (Skinnytaste.com) and then choosing a recipe from WeightWatchers.com for tonight's cookie.  It's healthy, see?!

Look at all those oats!!

Well, actually, it's not that healthy.  There's tons of sugar and a stick and a half of butter, but that's what makes cookies so delicious.  The main ingredient is oats, and oats fill you up, so at least you will eat less cookies before feeling totally satisfied.

What I love about this recipe is the cocoa mixed into the flour portion.  It helps work on that chocolate craving without being packed with chocolate chips.  What I don't love about this recipe is how much the dough expands when you bake them.  They spread waaaaaay out, so space out your dough accordingly.


Check out the original recipe here.  I swapped Craisins for dried cranberries and love the final cookie.  It's a thin, chewy, delicious and healthy-tasting treat, perfect for a feeling-fat-Monday.

Have a great week, Sweets!

Sunday, December 9, 2012

Easy Almond Butter Cookies

Hi Sweets!  So sorry for missing a day yesterday, I promise to make up for it at the end.  The hubs and I just got home from a weekend away in Lake Placid, NY which was amazing and unfortunately left no time for baking any cookies.  We spent our days touring the Olympic sites and attractions- we even rode the bobsled; it was so intense!!!


We got home a little after dinner tonight and I was super tired so wanted a quick and easy cookie to feature.  These butter cookies are about as easy as it gets.  You mix everything up all at once, roll the dough out into balls and bake for 10 minutes.  They are simple, cute and if you use the right sprinkles, very festive!


Did anyone do any baking this weekend?

Need:
1 stick of butter
5 tablespoons of sugar
1 cup of flour
1 tsp. almond extract
1/4 tsp. salt

Do:

Preheat oven to 350F.  Mix all ingredients together, roll out into balls and place on an ungreased cookie sheet.  I pressed mine flat with a fork which created little dips for Christmasy sprinkles to sit in.  The dough isn't very sticky, so you'll need to either press any type of sprinkle into the cookie or create ridges like I did.  Bake for 10 minutes.


Friday, December 7, 2012

Soft & Chewy Chocolate Drops with Hot Cocoa Frosting - Guest Post!


Today's post is written by my good friend Heather.  Heather and I were coworkers at my first "real" job, and then neighbors for two years.  Heather is a die-hard-"Michigander" (Go Blue!) and is an excellent running buddy.  She also makes the BEST Heath Bar Angel Food cake you will ever eat, so hopefully I will get her to share that one day, too.  I happen to know that Heather brought these into work and they were a huge hit.  One coworker who avoids butter like the plague couldn't even resist!  Thank you for sharing your cookies, Heather!!

---

Double-chocolate soft & chewy cookies


I've been craving a chocolate cookie and had one in mind that my mom made once years ago.  She couldn't find the recipe so I used the one on the back of the Bakers Unsweetened baking chocolate box.  You will need:

4 squares Bakers' Unsweetened Chocolate
3/4 cup butter (1.5 sticks)
2 cups sugar
3 eggs
1 tsp vanilla
2.5 cups flour

Dough with flour added
Heat oven to 350F.  Microwave unsweetened chocolate and butter in large bowl on high for 2 minutes (or until butter is melted - mine took more like 3 minutes).  Stir until chocolate is completely melted.  Add sugar and mix well.  Blend in eggs and vanilla.  Stir in flour.  (Do not over mix).  Refrigerate 1 hour or until dough is easy to handle.  (I was impatient and just refrigerated for 20-30 minutes.)

Shape into 1-inch balls (highly recommended - they keep their shape so just dropping them on the baking sheet makes them look yucky - too ugly to take to work!)

Balls of cookie dough
Bake 8 minutes or just until set (I let mine bake for 10 - they didn't look done after 8 minutes).  Let stand on baking sheet for 1 minute (if you don't wait the bottom falls out - at least that's what happened to me!  I'm going to fill it with frosting.)  Transfer to wire rack to cool completely.  This yields 5 dozen cookies (I got 61).

Baked cookies
Frosting!

I planned on using the recipe on the back of Hershey's Unsweetened cocoa but didn't think I had enough powdered sugar so I used hot cocoa mix that's mostly powdered sugar.

Hot Cocoa Frosting

1/4 cup of butter (1/2 stick)
Splash of milk (I used roughly half of a 1/3 cup)
1 3/4 cups hot cocoa mix (see below for recipe)

Melt butter.  Add hot cocoa mix and milk.  I mixed with a fork and it was really lumpy so I brought out my mixer to smooth it out a bit.  Still wasn't super smooth (see below).  The taste makes up for the lumps! :)

Lumpy but delicious frosting
Cocoa Mix (makes a whole bunch!!)

11 oz. jar non-dairy creamer
3 cups plus a little powdered sugar
2 cups Nestle Quick
1 1/3 cups non-fat dry powdered milk (enough for a quart of "milk")

Mix all ingredients together and store in an air tight container.  (Use 4 heaping tablespoons per cup of boiling water for actual cocoa.)