Saturday, December 22, 2012

Gluten-Free Nutella-Stuffed Brown Butter Sea Salt Chocolate Chip Cookies - Guest Post!


Today's guest post is by my friend Dori from OKnLA.  Dori and I worked on the same team but in different cities at a marketing/project management agency.  She is living the life, meeting celebs, kicking butt and taking names out in Los Angeles.  I miss working with Dori, but love keeping in touch and reading about her adventures!

---

Hello!  I'm Doriean and I blog over at oknla.blogspot.com.  Normally my blogs consist of album covers, music opinions and images of my life in Los Angeles.  But today, because Stacey was so great to ask me, I'm sharing a baking post!

I love baking.  Since I moved to my current place (a guest room off of my friends' garage) I haven't been able to bake much because I don't have my own kitchen anymore.  I didn't think I would miss it much, but I do!  So any excuse to bake is a good one.

This picture is from Ambitious Kitchen's blog- she has beautiful photography.  This is what the finished cookies should look like!
I've wanted to try this recipe from Ambitious Kitchen for a while with one twist; I wanted to make them gluten-free.  I don't have a gluten allergy, but I've found my body feels so much better when I avoid gluten.  So lately I've been doing my best to go gluten-free, meaning I use a different kind of flour.


My favorite part about making these cookies was melting the butter.  Okay, I'm lying.  My favorite part was the Nutella.  I love Nutella.  Whoever created Nutella should receive a medal.  Or a shrine.  Nutella is the most amazing spread and it's a wonderful addition to a cookie.


But back to the butter.  Usually when I make cookies I let butter reach room temperature.  But this recipe required melting the butter in a saucepan, and I love the way that move increases the buttery flavor of the cookies.  The rest of the steps to making these cookies are pretty typical, except that you should leave the dough in the refrigerator for at least two hour before baking so that the ingredients mingle and set.  Once that happens, you roll the dough into cookie dough balls, flatten the balls, grab a spoonful of Nutella, eat it.  Then grab another spoonful and plop it into the flattened dough ball.  Recreate the ball so that there's no Nutella poking out and then place it on the cookie sheet.  Fill your sheet and bake those puppies!

Now, gluten is one of the main things that make things like bread, muffins and cookies rise.  Without it, these items come out flat and not as picture perfect.  But they still taste yummy!  So if you're using gluten-free flour like I did, know that these cookies will be really flat.  But I promise, even though they're not picture perfect, they are for sure tummy perfect.


Thanks for reading!  Eat something yummy today, even if it's not gluten free.


Friday, December 21, 2012

Chocolate Rum Balls

"Hey Kid, do you like rum?"

"What's rum?  Rumplestilskin??"

Does anyone else love Big Daddy as much as I do?  So funny.  I can't have rum without quoting that line.


Anyway, tonight's cookie is something new to me- rum balls!  These were recommended by my husband's coworker.  They're an awesome no-bake, extremely rummy (har har) treat.  The dough is a cinch to put together, the rolling takes a bit more time.  These would be a hit for any chocolate and rum fans.  Like me. love love love.  Warning, despite only using 1/4 cup of alcohol, these definitely have a kick and should be enjoyed by adults only.

Here's the recipe:

Crush up 1 box of Nilla Wafer cookies, and put them in a large bowl.  Then, add the following ingredients and mix well:

  • 2 tablespoons of cocoa 
  • 1 cup of chopped walnuts
  • 1 cup of confectioner's sugar
  • 4 tablespoons of honey
  • 1/4 cup of rum
All you have to do now is roll the dough into bite-sized balls, and if you prefer, coat them in extra confectioner's sugar like I did.  I put mine in the fridge to firm up, and these can be frozen as well.  They are fine at room temperature if you don't have space in the fridge. 

Let me know in the comments below if you have your own version of Rum Ball cookies- I'd love to try some other recipes for these!


Thursday, December 20, 2012

Kolazcky Cookies - Guest Post!

Today's guest post is by my favorite baking buddy, Christina of All's Fare Food blog!  Christina and I are Cupcake Camp buddies every year, and love to bake together while our hubbies watch football.  Whenever the four of us go out to dinner, we all go home with sore cheeks because we have so much fun and laugh so hard.  Christina is a great friend and an excellent baker, so here we go!

---


Hello to all the readers of Boston Sweetie’s blog! I’m so happy to have been invited here to share a cookie recipe during this holiday season.

Growing up in the huge Midwest melting pot that is Milwaukee, I had the great privilege to be around all different types of ethnic foods. Each summer on the shores of Lake Michigan, you could flock to one of the weekly ethnic festivals like Irish Fest, Festa Italiana, German Fest or Polish Fest. At these weekend-long events, you could experience snacks and meals with an authentic touch from the old country.

One of my favorite recipes that could be found in many of Milwaukee’s southside bakeries is the Kolaczky Cookie. Pronounced coh-latch-key, this Polish cookie is flaky and filled with a fruity jam.  Several other European countries have their own version of the kolaczky with names like kolache, kolacky or kolace and can be filled with everything from sweet fruit to savory cheeses.

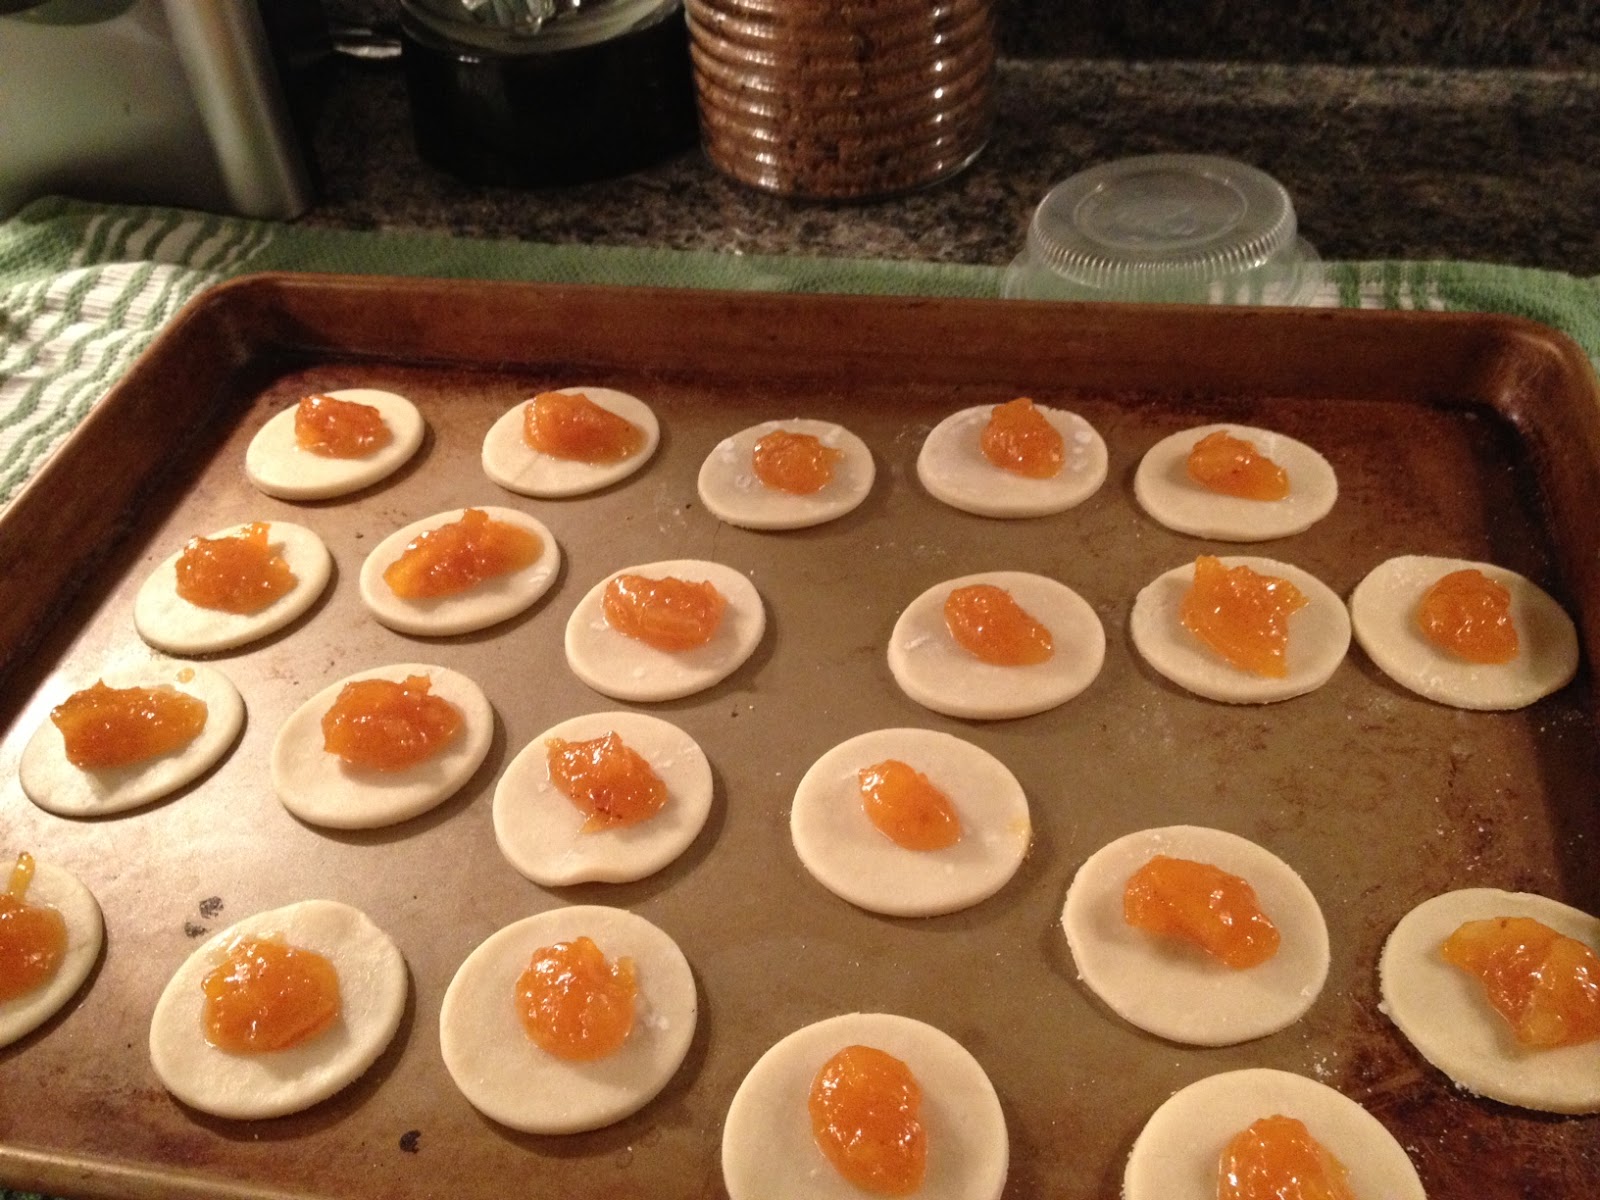
The kolaczky is actually quite easy to make. First, select your favorite filling – I opted for an orange marmalade that I found on the shelves at Home Goods one day. Then, mix together the dough, which is super simple to make. Finally, put the cookies together and bake. In about two hours, you can have more than two dozen of these wonderful cookie treats.


Orange Apricot Marmalade
I hope you enjoy!

What You’ll Need

  • 4 oz (1/2 brick) cream cheese, softened
  • 6 oz (1 1/2 sticks) butter, softened
  • 1 1/2 C all-purpose flour
  • 1 jar filling of choice (apricot, raspberry, strawberry preserves or jam etc.)
  • Confectioners’ sugar for dusting

Putting It Together

Beat the cream cheese and butter together until fluffy. Add in the flour a 1/4-cup at a time. Mix well. Cover the dough with plastic wrap. Chill in the fridge for at least 1 hour.


Preheat oven to 350 degrees.

On your work surface, use a mixture of granulated and powdered sugar to prepare the dough. Do not use flour here.

Roll out your dough to about 1/4-inch thick using a rolling pin. Add more of the sugar mixture if it gets too sticky.

Using a circle or square cookie cutter, cut into 2-inch shapes and place on cookie sheet.


Add about 1/4-teaspoon of filling to the center of the dough. Overlap opposite corners of the dough to cover the filling.


Bake for about 15 minutes until golden brown. Then, remove to a cooling rack.

When cooled, dust with powdered sugar and serve. Store in airtight container.


Wednesday, December 19, 2012

Mint-stuffed Sugar Cookies

Tonight's cookie is a little "semi-homemade" treat that I'm brining to my sister's graduation party tomorrow night.  I am so proud of her and all I can think about is how my little sister is a nurse! I had a lot to do tonight and not too much time to get creative, so I did a spin-off of a recent recipe I saw on Pinterest.


These cookies are just store-bought sugar cookie dough and junior mints with sprinkles.  That. is. it.  They taste great too, I love the combination of vanilla, chocolate and peppermint.  Tasty and festive and pretty to look at, too!


I had to do some experimenting with the baking times and for me the trick was 7 and a half minutes (yes, 7 was too short and 8 was too long) at 325 degrees.  

Besides Junior Mints, you could probably stick any mini-candy in the middle of these and they'd come out good.


Have a good week, Sweets!

Need:
1 log of store-bought sugar cookie dough
2 boxes of Junior Mints

Do:  
1.  Preheat oven to 325F.
2.  Cut the log into 1/2" slices, and quarter each slice
3.  Flatten one of the dough corners in your hand, place a candy in the middle, and roll the dough around it into a ball
4.  Dip the cookie ball into sprinkles 
5.  Bake a cookie sheet for 7 minutes.  If they seem too soft, try another 30 seconds to a full minute.


Tuesday, December 18, 2012

Bacon & Oatmeal Dried Fruit Cookies - Guest Post!

Today's guest post is written by my sorority sister Amy who lives in NYC with her husband Zach.  Amy is an incredible woman and an amazing friend.  We lucked out with this post as she is not often a baker.  She is, however, a really great chef and is excellent at incorporating bacon into everything, from cookies to vodka!  Enjoy!

---
Zach with the freshly baked cookies
Zach's work was having a bake sale at to benefit victims of Hurricane Sandy, so I once again made Bacon and Oatmeal and Dried Fruit Cookies. I originally found these in a magazine and snipped out the recipe for its incorporation of bacon. Side note: they do not come off as very oatmeal-y, since I had a friend who does not like oatmeal cookies inhale one and then state her aversion to oatmeal. These cookies are awesome because they taste like breakfast as a cookie-- sweet and salty! In fact, they sold out immediately from the bake sale and Zach's boss had to have a talk with him about how if he ever brings bacon cookies to the office building again, the cookies need to first stop in the boss's office!

The original recipe calls for raisins, but since I am not a raisin fan, I substituted a dried berry mix which includes cranberries, blueberries, currants, and golden raisins. You can use any dried fruit here that strikes your fancy.


Ingredients 
  • 8 ounces sliced bacon 
  • 2 1/4 cups cake flour 
  • 1 teaspoon baking powder 
  • 1 teaspoon kosher salt 
  • 1/2 teaspoon baking soda 
  • 1/2 teaspoon nutmeg 
  • 1/2 teaspoon cinnamon 
  • 1 cup (packed) dark brown sugar 
  • 2/3 cup sugar 
  • 1/2 cup (1 stick) unsalted butter, room temperature 
  • 2 large eggs 
  • 1 teaspoon vanilla extract 
  • 1 cup old-fashioned oats 
  • 2/3 cup dried fruit (chopped to the size of raisins if applicable)

The Work

The process is simple. I chose to make the bacon on a rack over a cookie sheet in the oven so that they crisped evenly; I was able to crumble the bacon right into the batter at the end with the oatmeal and dried fruit, plus I had the added bonus of having a pool of bacon fat to use later on.

Once the bacon is cooking, I start whisking together the dry ingredients mix in a mixing bowl: 2 1/4 cups cake flour, 1 teaspoon baking powder, 1/2 teaspoon baking soda, 1/2 teaspoon nutmeg, 1/2 teaspoon cinnamon, and 1 teaspoon kosher salt. Keep this dry mixture on the side for a bit. Then, you start creaming together the butter and both sugars in a mixer. Give that a few minutes before adding in two eggs, one at a time.

Then add in the vanilla- the original recipe calls for 1/2 teaspoon, but feel free to amp that up; I sure did. Keep the mixer moving-- you are going for a pale and fluffy batter look. Once that is achieved add in the flour mixture from before, little by little until well-incorporated. Then you can turn off the mixer.

After that, you are practically done with the prep. It is time to add in the oatmeal and dried fruit and crumble in the cooled bacon and fold. This recipe calls for chilling the dough: make 1/4 cup scoops of the batter onto two parchment lined cookie sheets (well spaced), cover w/plastic wrap, and chill for at least an hour, but I tend to let it go overnight.

When it comes time to bake the cookies, just preheat the oven to 375 degrees. Bake cookies for 20-22 minutes and cool first for 10 minutes on their sheets and then move to racks to cool completely. Remember to first put aside cookies for your significant other and boss and then enjoy the rest of the batch! Delicious.

Original Source: http://www.bonappetit.com/recipes/2012/03/bacon-oatmeal-and-raisin-cookies